mercoledì 22 ottobre 2014

Come fare il Root al Galaxy S2 Plus I9105P (Android 4.1.2 & 4.2.2)

Root-Galaxy-S2-Plus-GT-I9105P 
The Galaxy S2 Plus is the newer avatar of Samsung’s old bestseller Galaxy S2. The device was released back in February, 2013 with Android 4.1.2 (Jelly Bean) firmware out of the box. If you have recently bought this device and now planning to root it, there could be no better time this as we have finally come with an easy, reliable and working rooting tutorial for the Galaxy S2 Plus GT-I9105P.
If you are new to the Android scene, please be informed that rooting an Android device is an advanced activity that can significantly boost the performance of your device with the aid of apps and mods that require root privilege. The Google Play Store is stuffed with thousands of such apps that can enhance the usability and functionality of your device. Besides, by rooting your  Galaxy S2 Plus GT-I9105P you will also be able to install a custom ROM or Kernel. To find the answer to the question whether or not to root your device, click here.

Disclaimer:

It is a customary practice with us to put a disclaimer before every tutorial like this, warning you that willing to root your device is the same like willing to void its warranty. Further, it is not good for anybody to proceed with the method described below unless he/she understands what it is all about. Making any mistake while following the steps given below might turn your Galaxy S2 Plus into a shiny paperweight. And above all, we’ll shall not be responsible for any mishap or damage done to your device. It’s your phone, it’s your call!


Requirements and Preparations:

Here are a few preparatory steps and required resources that you must make and gather before attempting to root your Galaxy S2 Plus GT-I9105P.
  • Download Odin3 tool and unzip it on your desktop: Odin3_v1.85.zip
  • Download CWM for Galaxy S2 Plus GT-I9105P-
  • Download CWM flashable SuperSU zip package and copy it to the external SD card of your phone: UPDATE-SuperSU-v1.51.zip   Mirror
  • Make sure you have Samsung USB Drivers or Kies installed on your PC, if you do not have any of them, download and install it now: Click to Download
  • If you have installed Kies on your computer, make sure it is closed while you use Odin.
  • Rooting does not delete any files or apps on your phone but we still recommend that you backup your contacts, call-log, messages, apps, etc. before proceeding. Here are a few good backup apps for the purpose.
  • Charge your phone to at least 60% battery level.
  • Turn on USB Debugging on your device from Settings> Developer Options.
  • ClockworkMod Recovery for GT-I9105P on Android 4.1.2:
  • ClockworkMod Recovery for GT-I9105P on Android 4.2.2:

Installing CWM Recovery on Galaxy S2 Plus GT-I9105P:

Having taken care of the things instructed just above, you can now move on to the real action. Do the following steps to install ClockworkMod Recovery on your Galaxy S2 Plus.
  1. Turn off the phone and restart it into Download mode. To do this, press and hold Volume Down + Home + Power buttons together for 2-3 seconds. When you see the warning screen with yellow triangle, press Volume Up key to enter the Download Mode.
  2. Now launch Odin by double clicking the “Odin3-v1.85.exe”  file and then connect your phone to PC using USB cable.
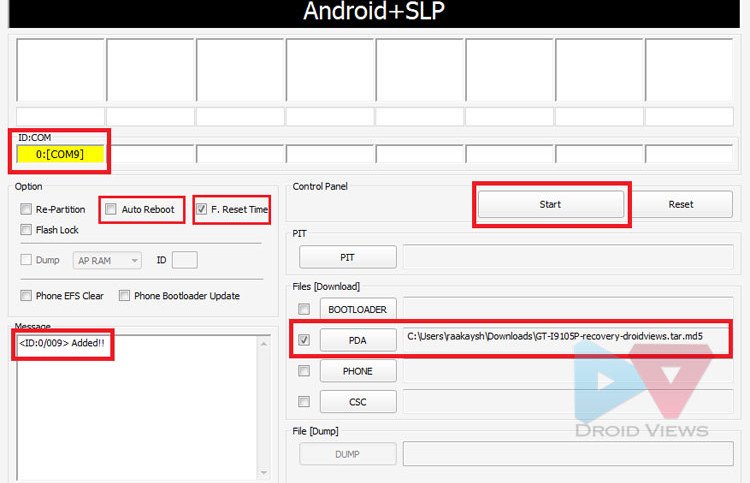
  3. Wait till Odin detects the device and you see ID:COM port turning to Yellow and “Added!!” at the message box below.
  4. Uncheck the “Auto Reboot” option on Odin and make sure that only “F Reset Time” is selected.
  5. Now click on PDA button and select CWM recovery file corresponding to your phone’s Android version.Galaxy-S2-Plus-GT-I9105P-Odin-1.85
  6. Finally, click the Start button and wait till installation finishes and you see PASS! message.
  7. Now close Odin, disconnect the cable and pull out the back cover and battery of your phone.
  8. Wait for about 30 seconds and reinsert the battery to its place.
Do not turn on your device and see below for further instructions.

Rooting Galaxy S2 Plus GT-I9105P:

CWM recovery is now installed on you device and our next move will be to install the Supe SU on it. To do that, follow these steps:
  1. Boot your Galaxy S2 Plus GT-I9105P in recovery mode: press and hold the Volume Up + Home + Power keys simultaneously till the Samsung logo with device name blinks fo 2 times. Then release the Power button and keep other 2 keys pressed till you see a blue menu on a a black screen with “ClockworkMod Recovery” written on the top of the screen.
  2. In recovery mode, use the Volume keys to scroll up or down and the Power button to select an option.
  3. Go to “install zip from sdcard> choose zip from sdcard” option and select “UPDATE-SuperSU-v1.30.zip”.
  4. When it is installed, go back and select “reboot system now” option.
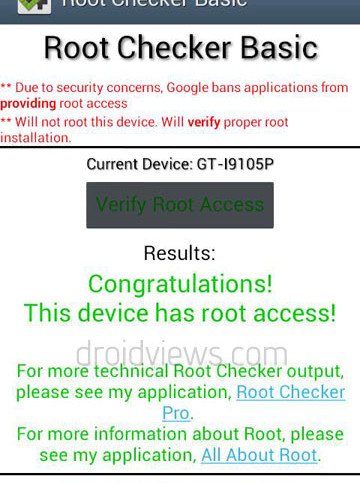
Your Galaxy S2 Plus will reboot now. Wait till it boots up normally it should be rooted and have CWM recovery, making you eligible to explore the whole of Android. Open the app drawer to check if a new app called “SuperSU” is present there. To further verify the root, download and install Root Checker app from the market and run it.

Root Checkerjoeykrim Tools FreeDownload
Galaxy-S2-Plus-GT-I9105P-Root-Verify
So, here ends our tutorial and we hope that it’ll work for you. Do not forget to share your thoughts with us. Cheers to all!


Fonte: http://www.droidviews.com/how-to-root-and-install-cwm-recovery-on-samsung-galaxy-s2-plus-gt-i9105p/

domenica 28 settembre 2014

La teoria del 100

La teoria del 100 nasce da verifiche empiriche sulle caratteristiche umane in cui emerge che 100 (100%) e' il totale delle caratteristiche disponibili che sono suddivise per le peculiarita' personali.

Ne emerge che una persona non potra' essere allo stesso tempo molto intelligente, molto estroversa divertente, molto forte/resistente fisicamente ed allo stesso tempo molto bella esteticamente/fisicamente o altre caratteristiche.
Il 100 dovra' essere ripartito; quindi una persona molto intelligente (55-60%) potra' avere una prestanza fisica ridotta (20-25%) e non potra' avere aspetto fisico eccellente (quindi non oltre al discreto (10-15%)).

Ecco perche' quasi sempre una persona molto bella esteticamente non e' molto intelligente e viceversa.

sabato 27 settembre 2014

How To Root HTC Desire X And Install CWM recovery

Today i am going to guide you on How To Root HTC Desire X and Install CWM                  Recovery.this is the simplest way to root HTC Desire X. And using Clockworkmod Recovery you can flash  custom rom on your device giving you full control over your phone.rooting can also used to flash custom recovery.img to overclock the processor.  so before rooting and installing we need some requirement.make a complete backup of your important data.

Requirements.

1. Backup all your important data.

2. We need to Enable USB Debugging.Go to Settings > Manage Application > Development >USB Debugging.Click the check box.

3. Maintain battery charge more than 60% .

4. We need to have BootLoader to be Unlocked. Use this guide to do that.

5.  Download HTC Desire X drivers and Install it.

6.  Download root files. cwm for jelly bean. Superuser-3.1.3-arm-signed.zip and Root kit.

7.You need to have a computer to root.

Procedure.

Step 1. Once you have downloaded all the requirement files.Extract the "root kit" on your computer.

Step 2. Devices which are updated to jellybean follow "Step 3"

Step 3. Now place the "cwm" file that you have downloaded to Recoveries folder inside Desire x all in one kit folder.and rename the file to "recovery.img"

Step 4. Now go to extracted folder and open "Desire.exe"

Step 5. Now you will find a option "Next Flash a Recovery" choose this.

Step 6. Now jelly bean devices select "your own recovery" and click "Flash recovery" button. for Iceam sandwich devices select the other option and click "Flash recovery" button.

Step 7. Now we have installed cwm on to your device.lets Root the device.so now copy the superuser.zip that you have downloaded on to your SD card.

Step 8. Reboot the device and press "Volume Down + Power" Button together for few seconds.after that select "Recovery"

Step 9. Now from clockworkmod (cwm) recovery you have to install superuser.zip.to do that select "Install ZIP from SD card" and find the superuser.zip file that you have downloaded.then click Yes.

Step 10. Now wait for few minutes and installation of superuser will be completer.now reboot your device and you can see super user app available.


Fonte

Il miglior telefono

Avere un telefono con molta memoria e con piu' processori e' la moda degli ultimi tempi.
Ma se il telefono lo uso per utilizzare Whatsapp ed altre 3 apps (di cui una e' Ruzzle) non serve a nulla un Quad Core con 8 GB di ram con schermo a 5".

Venendo da Smart Phone "vecchia" generazione di altissimo livello quali il Nokia E51 (voto 10 e lode) e successivamente Nokia E52 (voto 9 e mezzo), sono passato ad uno Smart Phone non di gamma alta bensi' media: HTC Desire X.

Telefono non Quad Core ma Dual Core con memoria limitata ma con prestazioni buone, disegno elegante, dimensioni tascabili (molto sottile, leggero e non grosso) e con una batteria di lunga durata (forse e' la caratteristica migliore del telefono).

Una volta cambiata la Recovery ed effettuato il Root del telefono ed installata una SD ROM (partizionata con 2 GB in EXT2 ed il resto FAT32), ho installato l'app LINK2SD che consente di spostare nella scheda SD le app come se fossero parte della memoria interna del telefono.

A questo punto il telefono non ha piu' i limiti di memoria per l'installazione delle APP e la RAM e' ampiamente sufficiente per gli usi che ne devo fare.​
 
Ottimo telefono.


How to Install TWRP Recovery on the HTC Desire X

TWRP Recovery for the HTC Desire X
If you’re looking for a way to install TWRP Recovery on your HTC Desire X, then look no further as the guide below explains everything you need to get the aforementioned recovery up and running on your device. Although rooting a device is a bit difficult task, flashing a custom recovery isn’t at all. And with our guide below, you’re covered with all the downloads and steps. So, let’s get started:

I. Before You Begin:

1. You must have done our How to Root the HTC Desire X procedure.
2. This will replace your current recovery with the TWRP Recovery.

II. Downloading Required Files:

1. GooManager — QR Code (Google Play Link)

III. Installing TWRP Recovery on the HTC Desire X:

1. First of all, download and install the GooManager app on your device using the link provided above.
2. Once installed, open it from your App Drawer.
3. Press the Menu key on your device and select the option that says Install OpenRecoveryScript.
4. Tap the Yes button to confirm your action.
5. You can now see the model number of your device on your screen, if it’s okay, hit Yes.
6. Now sit back and relax as the app will automatically download and install the recovery on your device.
7. You’re all done!
Awesome! You now have a custom recovery up and running on your Desire X allowing you to play around with custom ROMs and Mods!


Fonte